Cluttered work areas raise stress and cut focus. This short guide solves a clear problem: fitting daily tools onto a narrow table without piles that break concentration. You will get a step-by-step plan that starts with decisions and measurements and ends with simple maintenance routines that keep the system working.
Here, “organized” means a usable work surface, fast access to essentials, and fewer visual distractions in a tight workspace. Follow five strategy pillars: declutter first, contain items, go vertical, tame cords and paper, then maintain the setup.
Expect practical fixes that work when drawers are missing: under-desk towers, monitor risers, and wall organizers that free surface area. The recurring theme is a clear desktop so the table is actually usable for work.
This advice fits remote workers, students, creators, and anyone building a home office in the United States. Read on for concise steps that keep your workspace calm and ready.
Key takeaways: Clear surface = better focus. Use vertical solutions and cord control. Maintain a simple routine for lasting order.
Why a narrow desk feels cramped and how organization fixes it
What makes a narrow work area feel tiny isn’t width — it’s the clutter that eats usable room.
Visual clutter raises mental load. Research links messy surfaces with higher stress and lower focus. Every item left out steals attention and slows decision-making.
Micro-frictions add up. Hunting for a pen, shifting papers to type, and moving a mug cost precious time and interrupt flow.
What functional and beautiful means today
Functional and beautiful blends clean design with practical storage. Think matching bins, consistent labels, and balanced layouts that calm the eye.
- Hide excess in closed containers while keeping daily tools within reach.
- Use wall mounts and shelves so the desktop stays clear.
- Create symmetry with uniform organizers for a calmer look.
These steps turn a narrow surface into a useful home office and set the article up as a practical system for lasting desk organization.
Set your goals for a small home office desk setup
Start by naming the single outcome you want from your home office: more clear tabletop, faster workflow, or a dual-role station that stays calm.
Decide what belongs on the surface and what lives nearby
List the items you truly need within arm’s reach. Typical choices: laptop, monitor, a notebook, and one pen cup.
Everything else—extra supplies, reference files, or backup chargers—should have nearby storage. That keeps daily work running smoothly and prevents pile creep.
Create a daily clear desktop rule
“My number one rule: nothing extraneous lives on the desktop at the end of my work day (except perhaps a laptop).”
Make the clear desktop rule non-negotiable. Treat it as a five-minute reset ritual that preserves focus and lowers friction when you switch roles.
Assign each category one place so things stop migrating onto the surface. Build a small daily essentials kit that earns desktop access; store the rest off-surface.
Next step: measure the tabletop and map zones so storage choices fit the actual footprint.
Measure your space desk area and map your zones
Start with numbers: exact measurements stop poor-fit organizers from stealing work area. A quick tape check reveals what will actually fit on a narrow tabletop and what must move off the surface.
Measure tabletop depth, wall space, and under-desk clearance
Measure width and depth (example: 23.5 x 47 inches) before buying any organizer. Confirm wall height and clearances around the table for shelves, pegboards, or a calendar.
Check under-desk clearance for knees, chair arms, and foot room before committing to drawer stacks or rolling storage.
Plan zones for work surface, supplies, paper, and tech accessories
Define four compact zones: a primary typing/writing work zone, a quick-grab supply zone, a paper zone, and a tech/charging zone for chargers and accessories.
- Match organizer footprint to each zone so storage expands capacity without shrinking usable surface.
- Move nonessential tools and supplies off the top into vertical or under-desk storage.
- Good zones cut reaching, re-stacking, and mid-task interruptions.
Tip: For layout ideas, see the desk layout guide.
Identify your desk organization problem areas
Spotting repeated mess patterns reveals the real barriers to a calm work surface. Spend a few minutes listing where clutter lands and what interrupts your flow.
Surface pile-ups, paper overflow, and the catch-all drawer trap
List your top three mess patterns: surface pile-ups, paper overflow, and the catch-all drawer that hides everything.
- Surface pile-ups: items left where you work instead of a home.
- Paper overflow: stacks with no inbox or outbox.
- Catch-all drawer: one drawer that becomes a junk catch.
Pinpoint friction points that waste time during the day
Take a quick “before” photo to reveal where clutter consistently lands and which zones fail. Photos make patterns obvious.
Watch for cords that snag, tools stored too far away, and notes that vanish under stacks. Each friction point costs you valuable time.
Connect problems to fixes: give paper an inbox/outbox, divide small items into bins, and mount cord routing so nothing slides. The goal is clear: less time managing the surface and more time actually working.
Sort office items by category before you buy organizers
A quick sort of every piece on and near the table saves money and prevents mismatched buys.
Start by pulling everything off the surface and out of any bins. Seeing every item stops hiding clutter and reveals true needs.
Group supplies, tools, paper, and devices
Work through clear categories: writing tools, charging gear, mailing and shipping tools, notebooks, reference paper, and devices. Place each group in its own pile so you can compare volume.
Separate daily-use items from project-based projects
Keep only daily essentials within arm’s reach.
Move longer-term projects into a labeled project bin or a nearby shelf. This prevents ongoing work from claiming the surface.
- Do a quick inventory to remove duplicates like extra staplers and chargers.
- Avoid buying an organizer before sorting—misfit compartments waste room.
- Finish by noting problem areas; you are now ready for a fast declutter session with clear decision rules.
Declutter clutter fast without getting stuck
A quick purge session frees mental bandwidth and reclaims usable surface immediately. Use simple decision rules and short bursts of action so the task doesn’t become another stalled project.
Trash, recycle, donate, relocate: quick decision rules
Fast rules: trash broken items, recycle outdated paper, donate useful duplicates, and relocate things that belong elsewhere.
- Start with easy wins like empty cups and non-working pens to build momentum.
- Set a single pile for giveaway items and move it out of the room that same day.
- This reduces clutter and makes the next steps simpler.
Handle paper with a simple three-part system
Paper System of Three: shred/toss, file, take action. Sort each sheet into one of these bins so paper stops forming piles on a narrow surface.
Create a temporary projects box and use a short timer
Give active tasks a labeled box so projects don’t sprawl across the tabletop and steal focus. Keep the box nearby, not on the main work area.
Set a short timer for 10-15 minutes and attack one pile at a time. Repeat daily for 5-10 minute maintenance sessions to keep momentum and save time.
Remember: decluttering aims for usable order, not perfection. Once items are pared down, containment and storage systems become effective.
For more practical tips, see home office tips.
Keep the desk surface clear while still storing essentials
A tight table stays useful when every item on the desktop earns a real purpose. The surface should support active work, not hold long-term storage.
Choose a compact essentials organizer
Pick one small organizer that holds only daily basics: pens, sticky notes, paperclips, and a tiny tool or two. This prevents stray items from spreading across the desktop.
Create storage under the monitor
A monitor stand makes a second layer. Slide a thin notebook, a file folder, or a slim tablet under the screen to free the main surface.
Add an under-desk keyboard tray
An under-desk keyboard tray tucks the keyboard away when not in use and returns precious inches to the work area. The tray is an instant gain on a narrow table.
Pick one landing spot for daily carry items
Designate a single spot for keys, badge, and earbuds so they don’t become random piles. Train yourself to drop items there each day.
- Test the layout for a full day and note what truly earns a place.
- Keep the desktop habit: if an item sits more than a day, move it off the surface.
- Next step for desks without drawers: build an under-desk drawer system that acts like built-in storage.
Build a drawer system when your desk has no drawers
A clear stack of plastic drawers acts like instant built-in storage without any carpentry. These under-desk towers reclaim legroom and keep daily tools reachable. Clear fronts show contents at a glance so you spend less time digging.
Pick stackable clear drawers for quick under-desk storage
Use stackable clear plastic units as the most direct add-on when your furniture has no built-ins. They are light, affordable, and fit tight footprints.
Label each compartment so every item has a home
Labeling matters. Wrap craft paper labels around the front and stick a brief name. This simple step keeps office supplies sorted and reduces decision fatigue.
Keep tall stacks stable and leave one drawer free
Tall towers can wobble because plastic is lightweight. Keep stacks shorter, split items into two low towers, or anchor a unit against a wall. Leave one empty drawer as an overflow buffer so the system survives busy weeks.
- Sample drawer map: writing tools, sticky notes, shipping supplies, tech adapters.
- Use clear units for visibility and quick retrieval.
- After this, expand capacity with wall-mounted storage for items that don’t fit under the surface.
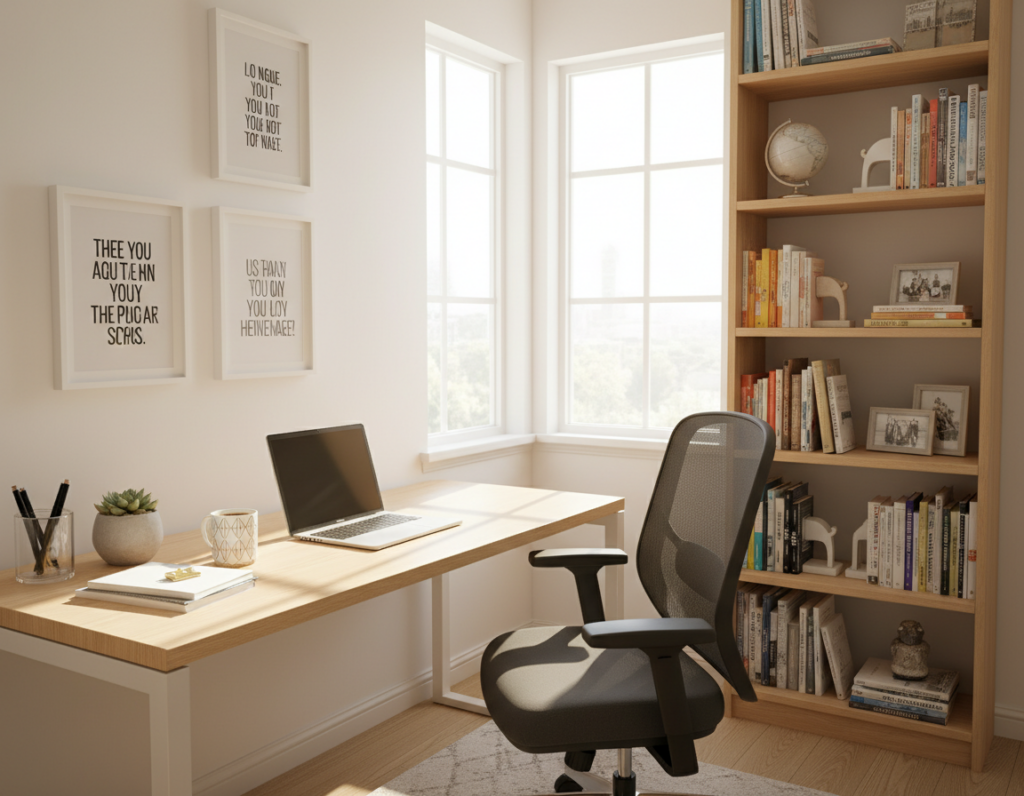
Maximize vertical storage with wall solutions
When tabletop depth runs out, the vertical plane becomes your best friend for reclaiming order.
Floating shelves for notebooks, organizers, and décor
Floating shelves keep notebooks and a few organizers off the surface without adding furniture. They present a tidy row of items and free up inches for active work.
Pegboards and wire grids for tools and accessories
Pegboards and wire grids keep scissors, chargers, and small tools visible and reachable. Hang baskets or hooks so accessories stay in place and the desktop stays clear.
Wall calendar or glass whiteboard for notes
An acrylic weekly calendar or glass whiteboard moves planning and quick notes off the table. Pick a model with an add-on inbox bin and a small hook for keys to centralize daily items.
Clipboard walls and hooks for active papers
Use a clipboard wall as an active paper system. Clip current forms and project sheets so they stay accessible without turning into piles.
- Core principle: match wall storage with your work, paper, and tech zones.
- Keep mounts low enough for easy reach and grouped by function.
- Limit items per shelf so wall storage supports workflow, not décor clutter.
Use cubbies, cabinets, and compact storage to expand capacity
A compact cube unit acts like an extra wall of storage that keeps paper and supplies off the tabletop.
Cube systems pair well with an IKEA table (for example, an 8-cubby unit beside the desk). Place stackable paper trays in the top cubbies for layered handling of incoming sheets and action items.
Fabric bins and vertical file organizers
Use fabric bins in lower cubbies for rarely used items. This hides visual clutter while keeping categories contained.
For manuals, folders, and reference paperwork, add vertical file organizers in another cubby. They stop stacks from forming and make retrieval fast.
Tall cabinets, filing needs, and rolling cart options
Add a slim cabinet or a tall filing cabinet when archive paperwork must stay but isn’t needed daily. This protects records and frees tabletop room.
When furniture additions aren’t possible, choose a rolling cart as a mobile solution. It keeps extra capacity nearby and can move out of the way when not in use.
Tip: Check local listings like Facebook Marketplace for used cabinets and units that fit a tight floor footprint without breaking the budget.
- Cube storage adds volume without claiming the desktop.
- Paper trays inside cubbies create vertical layers and eliminate pile-ups.
- Fabric bins + vertical files keep archives tidy and accessible.
Create a paper management system that stops piles
Untamed papers are almost always a systems problem, not a willpower issue. Give incoming sheets a fast, repeatable path and piles vanish.
Set up inbox, outbox, and a take-action tray
Place one inbox for new mail, forms, and items that need review. Add an outbox for completed items that must leave the room.
Add a single “take action” tray for urgent items that require immediate steps. This keeps important papers from floating on the tabletop and reduces daily friction.
Use simple filing, color-coding, and labeled boxes
Adopt basic file folders with clear labels for core categories. Use color tabs for fast visual scanning—one color per topic or client.
Keep longer archives in labeled document boxes so reference material stays accessible but off the main surface.
Separate active projects from reference filing
Store active project papers in a shallow project tray or a dedicated folder. Move completed or reference files into your main filing system.
- Why this works: trays create an automatic path so papers move, not pile.
- Weekly habit: block 20–30 minutes once a week to clear the inbox and process the take-action tray.
- Result: when paper has a home, the desktop stays open for real work and focus.
Contain small office supplies so drawers stay organized
Tiny items cause the biggest mess: pens, clips, and adapters slide into dark corners and vanish. That shift, mix, and hide pattern makes a drawer useless within days.
Use dividers and mix-and-match clear bins
Start with modular dividers and clear bins in multiple sizes. Give each category a single compartment so supplies and small tools don’t mingle.
Line and secure organizers so nothing slides
Line drawers with a thin non-slip mat to protect surfaces and keep lightweight plastic organizers steady. Add tiny Museum Gel dots under bins; the gel holds an organizer in place without damage.
Label compartments and store backups elsewhere
Labels matter. Mark each bin clearly so anyone can put items back. Keep backup office supplies outside the primary zone — a shelf or cabinet works well — so the desktop and top drawer host only daily essentials.
Fast result: when tools and supplies don’t move, you stop losing minutes to re-sorting and your organized desk stays useful.
Cord and power control for a safer, cleaner workspace
Loose cables turn a tidy tabletop into visual noise and steal precious work room. A few simple moves cut clutter and make the area safer.
Mount a surge protector and choose a flat plug for tight spots
Pick a power bar with multiple outlets and USB ports. Mount it under-desk or along the back edge so plugs stay off the floor and off the surface.
Flat plugs sit nearly flush with the wall. They let furniture hug the wall and free inches in tight space.
Bundle, tag, and route cords under the table
Unplug, identify, and add labels to each cable. Bundle excess length with Velcro straps and route lines under the table with adhesive clips or a cable tray.
- Tag each cord for quick ID.
- Use clips or trays to prevent snagging when you move your chair.
- Keep only needed length visible so the tabletop stays clear.
Create one charging spot for laptops, phone, and accessories
Designate a single zone for charging devices and small accessories. This stops charging sprawl and makes power use predictable.
Result: fewer loose cords, fewer trip hazards, and a cleaner-looking office solution.
Desk organizers and accessories that save space on a narrow table
Smart accessories create layers of function so a narrow tabletop keeps clear and useful. Choose pieces that lift items up, tuck them under, or stand them vertically. That layered approach expands usable surface without buying a larger table.
Monitor risers with drawers and compact tray systems
Monitor risers add height for better posture and hidden storage beneath the screen. Pick models with shallow drawers for sticky notes, pens, or a slim power bank so essentials stay out of sight but within reach.
Compact tray systems stack papers into an inbox/outbox flow. A two- or three-tier tray keeps active sheets visible without sprawling across the tabletop.
Vertical file holders and letter boxes for quick-grab storage
Vertical file holders and letter boxes hold folders and notebooks upright. They make retrieval fast and prevent pile creep.
Under-desk hooks and baskets for bags, headphones, and tools
Mount under-desk hooks for headphones and bags to clear chair backs and floor clutter. Add an under-desk basket for larger items that shouldn’t live on the surface but must stay nearby.
- Layers work: up, under, and vertical keep the desk surface usable.
- Choose items that match measured dimensions so the narrow table isn’t reduced by poorly fitted accessories.
DIY and budget-friendly small desk organization ideas
You don’t need fresh purchases to clear and style your work area. Simple projects reuse common items and cut clutter while keeping costs low.
Repurpose jars, tin cans, and cereal boxes
Glass jars make clear holders for clips and coins. Tin cans hold pens and tools. Wrap cereal boxes in contact paper to create upright file holders that look tidy on a shelf.
Quick DIY dividers for drawers and trays
Cut cardboard or foam board into strips and tuck them inside a drawer or tray to form custom compartments. This method works for a single drawer or multiple drawers and fits odd sizes instantly.
Simple wall-mounted organizers you can build in an afternoon
Mount a small shelf with a few hooks for keys and a charging station. Or create a clipboard wall for active papers and project notes. These wall solutions keep the tabletop clear and life easier.
Pro tip: After decluttering, upgrade looks with uniform labels and matching wraps so DIY items read as intentional design. These ideas scale well whether your work area is in a bedroom, living room, or a dedicated home office.
Maintain an organized desk system that lasts
A steady maintenance routine keeps your setup useful and prevents clutter from coming back. Short, regular actions make the system resilient and save time over weeks and months.
Daily reset routine
Five-minute checklist:
- Clear the surface of loose items.
- Return pens and tools to labeled bins.
- Reset the inbox tray for new paper.
Rule: end each work day with a clear desktop. This single habit preserves focus for the next session.
Weekly paper processing
Empty the inbox, file reference documents, shred or toss junk, and calendar action items. This weekly sweep keeps paper from overflowing and slows pile buildup.
Monthly review
Remove unused items, test friction points, and adjust the layout as responsibilities change. A monthly check keeps the system aligned with real needs.
Labeling habits that stick
Labels reduce decision time. Clear names on bins and trays guide returns and improve follow-through. Track where clutter reappears; recurring spots show a category needs a better home.
Result: short, consistent resets prevent major weekend cleans and keep desk organization stable while saving you precious time.
Conclusion
Clear goals, measured choices, and layered storage turn a tight tabletop into a productive hub. , These steps cut visual noise and reduce stress so work flows with less friction.
Summarize the approach: set a goal, measure the area, spot problem zones, sort and declutter, then add storage in layers — on the surface, under the table, and on the wall. High-impact moves are simple: a daily clear-surface rule, an under-desk drawer substitute, and a paper filing workflow that prevents piles.
Use vertical solutions like shelves, pegboards, or a calendar to expand capacity without stealing desktop real estate. Route power with a mounted surge protector and flat plugs so cords are out of sight and the workspace is safer.
Pick one storage solution that matches how you work today and protect it with short maintenance habits: daily resets, weekly paper processing, and a monthly review. Start with one change now — an inbox tray, under-desk drawers, or a wall calendar — and build from that win.