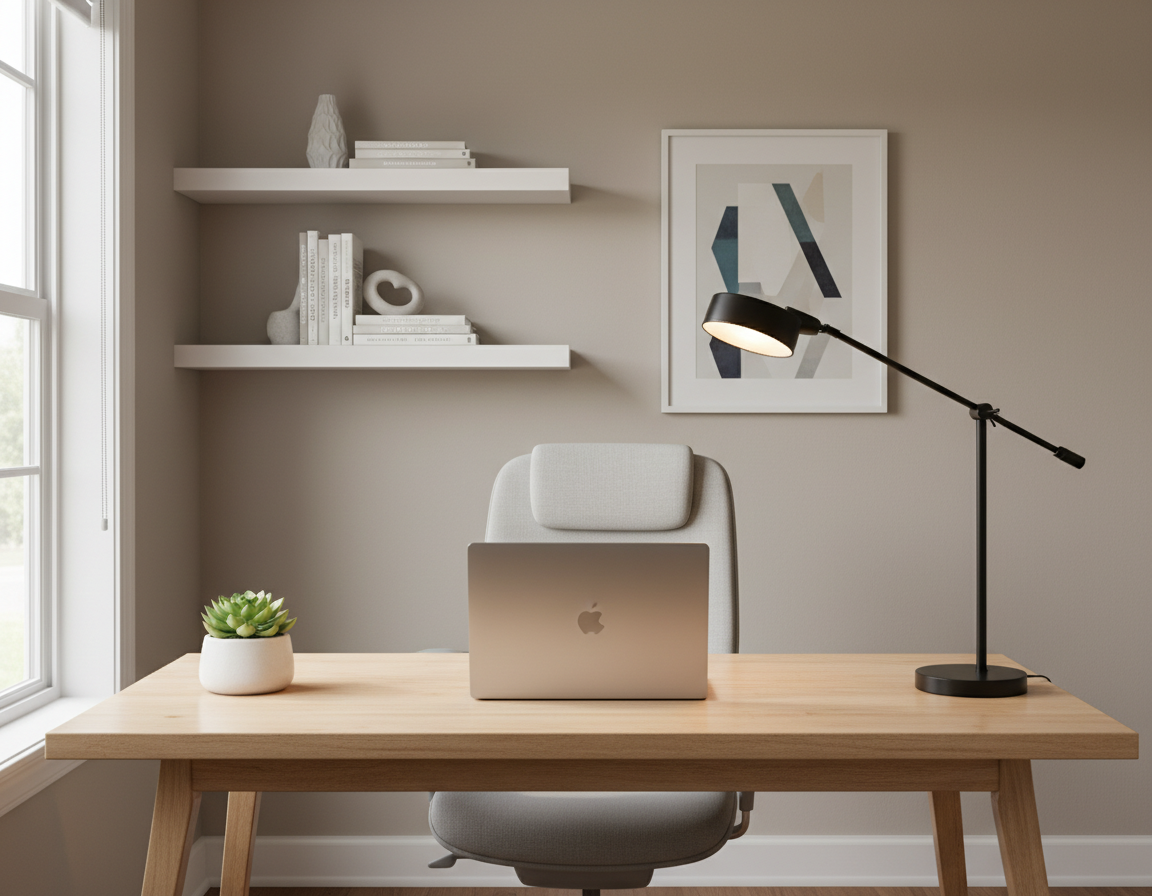
Minimalism that works focuses on function, not emptiness. A functional approach let people keep only daily items on the desk to cut visual noise and boost productivity.
In real home office settings, a smart layout meant fewer visible items and better placement. This produced fewer micro-distractions and more time for focused work.
The guide previews a clear list: start with the surface, create zones, set monitor and laptop height, solve storage and cable issues, then refine lighting and routines. It will include concrete sizing tips like monitor height, desk depth, and lighting color temperature.
Practical, one step at a time. Use the one-change-at-a-time method to adopt clean layout ideas without overhauling your setup. This guide targets remote workers, students, and professionals who want a calmer workspace with less clutter and more comfort.
What a Clean Desk Layout Really Means for Productivity
When visual noise is reduced, people find it easier to start and sustain deep work. A purposeful surface keeps only day-to-day tools visible so your mind can focus on one task at a time. Research and practical guides often summarize this as “cluttered desk = cluttered mind.”
Visual clutter raises context switching and drags attention away from important tasks. The solution is a simple system: what stays in sight, what stays within reach, and what goes into nearby storage.
Minimalism vs. empty work surfaces: keeping only what you use daily
Think in terms of daily drivers — keyboard, mouse, primary notebook, water bottle — and move occasional things into drawers. A practical rule: if you didn’t touch an item in the last workday, it probably shouldn’t take permanent space.
- Limit items to daily essentials to cut decision fatigue.
- Adopt a five-minute end-of-day routine to prevent buildup.
- Give every object a purpose, a place, and a frequency of use.
For additional focus and productivity guidance, see three focused setups that streamline how you keep desk items and manage time.
Start With the Right Desk and Surface Space
Start by choosing a work surface that gives you room to move and keeps essentials within reach.
Choosing simple frames and neutral finishes
Pick one of the plain, minimal desks in white, black, or natural wood. These finishes make a room feel calmer and hide visual noise.
Simple frames and few built-in details reduce distraction and make cable runs easier to hide.
Sizing guidelines that leave room for monitors and accessories
Allow a minimum depth of about 60 cm (2 ft) so a monitor, keyboard, and mouse sit comfortably without crowding. That depth gives enough space for writing and mousing.
- Choose width by workflow: single monitor, dual screens, or paper-heavy work.
- Prioritize open surface area so accessories don’t stack into piles.
- For small rooms, measure chair glide and elbow clearance before you buy.
The right desk is the foundation for every other improvement in your home office. Start here and the rest of your setup will fall into place.
Build Your Layout Around Work Zones, Not Piles
Organize your workspace by purpose so tools live where you use them, not where they pile up. Zoning is the core concept: give each category of work a dedicated place and stop things from turning into piles.
Using a desk pad to visually segment task areas
A simple desk pad acts as a visual boundary for core tools. A 24×14 inch mat is a common recommendation for comfort and noise reduction.
Place your keyboard, mouse, and notebook on the mat so they stay together and don’t spread across the surface.
Designing an “in-reach” zone for essentials
Set an in-reach zone on your dominant-hand side for daily devices like a phone stand, pen, and earbuds. This cuts hunting during tasks and speeds up flow.
Never keep rarely used cables, backup drives, or spare stationery in this area; move those to nearby storage.
Creating a drop zone to prevent end-of-day clutter
Reserve a small drop zone near the edge for temporary items—mail, receipts, or adapters. Make a strict rule: clear it at the end of each day.
“When every object has a place, clutter becomes obvious and easy to fix.”
- Zones reduce time spent moving items and speed transitions between tasks.
- They make it easy to perform a quick daily reset and keep the workspace tidy.
- Use a desk setup that supports these zones and stick to the habit-based way.
Clean Desk Layout Ideas That Keep Only the Essentials in Sight
Choosing a small set of reliable tools is the fastest path to a calmer workspace. Start with a short list of items you truly use every day and keep them visible. That simple rule prevents random extras from creeping back onto the surface and reduces visual clutter.
The everyday essentials list for a practical desk setup
Use this checklist for a typical US home office:
- Ergonomic keyboard and mouse
- Primary laptop or PC and a reliable charger or dock
- Notepad or planner and one good pen
- Reusable water bottle and a small task lamp
Quality over quantity: fewer tools that do more
Invest in multi-purpose gear. A solid USB‑C dock replaces several dongles and frees up space. Fewer, better tools speed tasks and lower the urge to keep extras “just in case.”
Limiting décor to a small number of personal touches
Keep personal items to 1–3 pieces—one framed photo, a small plant, or a single art print that fits a calm palette. Rotate seasonal accents instead of adding more.
Quick audit tip: remove one non-essential item per day for a week. You’ll reset your baseline and see what truly belongs on your surface.
Optimize Your Monitor Setup to Free Up Desk Space
Smart positioning of your displays reclaims workspace and reduces neck strain during long sessions. Raising a screen on a monitor stand typically adds 4–8 inches of usable surface beneath the display. An adjustable monitor arm, by contrast, gives maximum clearance and flexible tilt, swivel, and height control.
Monitor stands vs. monitor arms
When to pick a stand: stands shine for budgets and steady placement. They are simple and stable.
When to pick an arm: arms win on tight surfaces, frequent repositioning, and cleaner cable routing. Arms also reduce neck and shoulder strain by allowing precise tilt and reach.
Single, dual, and triple layouts
Single-monitor setups work best when you center the screen and keep the keyboard aligned. Keep side clutter minimal.
Dual displays boost efficiency—studies show about a 30% gain for many workflows. Use matching heights and small bezel gaps to avoid visual breaks.
Triple arrays are for specialized work. They demand strict cable management and identical monitor height across the array.
Ergonomics and final tips
Set the top of the screen near eye level, add a slight tilt to cut glare, and place displays at a comfortable viewing distance to reduce eyestrain.
“Route monitor cables down the arm or stand path and bundle them so the surface looks intentional.”
Elevate Laptop Setups With Stands, Mounts, and Docks
Small hardware swaps deliver big wins. A raised screen and a single connection point change how you use the surface. This is the fastest path to more usable area and better posture.
Why laptop users often feel cramped: extra adapters, multiple cables, and no room for an external keyboard and mouse make the surface feel cluttered. Those factors also increase setup time and distract from focused work.
When a raised screen or arm helps most
Use a simple stand to lift the screen and free space beneath for storage or a keyboard. Pairing a laptop with an external keyboard and mouse improves posture and comfort.
An adjustable arm is best for very small desks, multi‑device workflows, or when you swap between work and personal machines. Arms reclaim depth and offer quick repositioning without moving other devices.
Hubs, docks, and the clean plug-in strategy
A single dock replaces many cords by consolidating power, video, and peripherals into one connection. Mount the hub under the desk or near the back edge to shorten cable runs and hide bulk.
Wireless keyboards, mice, and headphones cut visible cord count and make daily resets fast.
- Choose a stand if you need space under the screen (stand: 1).
- Pick an arm for small surfaces or frequent device swaps (arm: 1).
- Select a dock that supports power delivery and video to minimize cable runs (cable: 2).
- Prefer wireless peripherals to reduce visible cords.
“One tidy connection beats five loose cords.”
Go Sit-Stand Without Wrecking Your Layout
Switching between sitting and standing can free up energy, but only if your workspace stays steady during movement. An adjustable standing desk that rises from about 24–50 inches gives flexibility without forcing a full rebuild of your setup.
Standing desk and riser choices that stay minimal
Full standing desks suit long-term standing users and offer cable channels and built-in power options. A sit-stand riser is an easier test: it lifts monitors and leaves the original surface intact.
Stability, weight support, and cable routing at height
- Look for rigid frames and low wobble—wobble increases fatigue and makes the area feel messy.
- Plan weight support: add monitor arms’ ratings and factor in heavy towers or dual screens.
- Route cable with extra slack at joints, anchor runs in trays, and avoid tight tug points that unplug devices.
- Use one central power approach (mounted strip plus a small cable box) to prevent dangling cords during movement.
Standing reset tip: after raising the surface, quickly check keyboard and mouse alignment and monitor height so posture and flow stay consistent.
Storage Solutions That Hide Clutter Without Slowing You Down
Good storage turns visible clutter into accessible order without extra effort. Think of storage as workflow support: store things you rarely use out of sight, and keep daily tools within reach.
Under-desk drawers and trays
Under-desk drawers and shallow trays are ideal for items you don’t need every day. Use them for spare chargers, sticky notes, backup cables, and external drives.
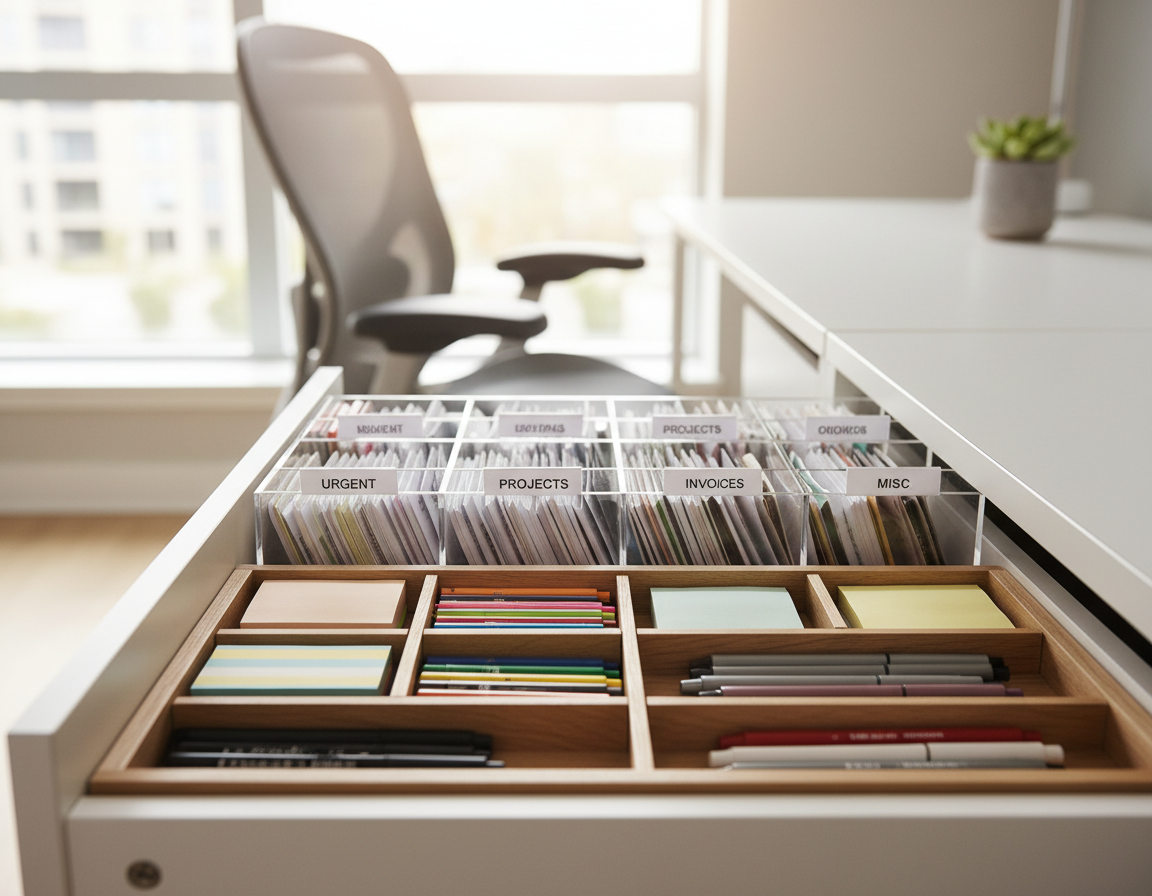
Drawer dividers and small organizers
Prevent the junk drawer effect. Add dividers so small things—SIM tools, batteries, adapters—have fixed spots. Finding a tiny item should take seconds, not minutes.
Paper control and mobile storage
Manage paperwork with vertical holders for active files and a mobile file cabinet for archives. Mobile cabinets protect the surface and roll away when you need floor space.
Monitor shelves with compartments
Use a monitor riser that includes compartments. It raises the screen and hides essentials like chargers, a notebook, or glasses close enough to use.
“Keep storage close enough that putting things away feels faster than leaving them out.”
End-of-day reset: in under five minutes, move items from the drop zone into their drawers or holders. The best storage is convenient—so clutter stays gone for good.
Vertical Storage With Pegboards and Wall Space
Vertical storage turns underused wall area into a fast-access hub for daily gear. It keeps the surface clear and reduces time spent hunting for items.
Compare two common approaches:
Desk-mounted versus wall-mounted systems
Wall-mounted pegboards offer greater capacity and feel permanent. They work well when you know your long-term setup and want heavy-duty organization.
Desk-mounted pegboards are modular and renter-friendly. They attach to the work surface and move with you, so they suit changing spaces or short-term setups.
Hooks, shelves, and what to keep on the board
Reserve pegboard spots for headphones, cables, small tools, and one notebook. Use a simple rule: one hook for headphones, one shelf for a notebook, one small bin for daily accessories.
- Visual balance: arrange items symmetrically and use a limited color palette to avoid a busy wall.
- Practical tip: label or mark spots so every accessory has a known location.
- Result: less surface piling and faster retrieval for common tools.
vertical storage solutions make it easy to convert wall space into an organized, usable area for your home office.
Cable Management That Eliminates the “Rat’s Nest”
Tangled cords turn a polished workspace into a visual mess and a safety risk. With a few targeted moves you can cut that clutter and keep power paths tidy while preserving access for changes.
Under-desk trays, sleeves, clips, and straps
Under-desk trays lift cords off the floor and give a consistent route for cables from your computer and accessories. Use a 40-inch cable sleeve for long runs and clips along the edge to keep power lines and data lines separate.
Bundle groups with Velcro straps or cable ties and leave gentle service loops so you can move or swap devices without knots.
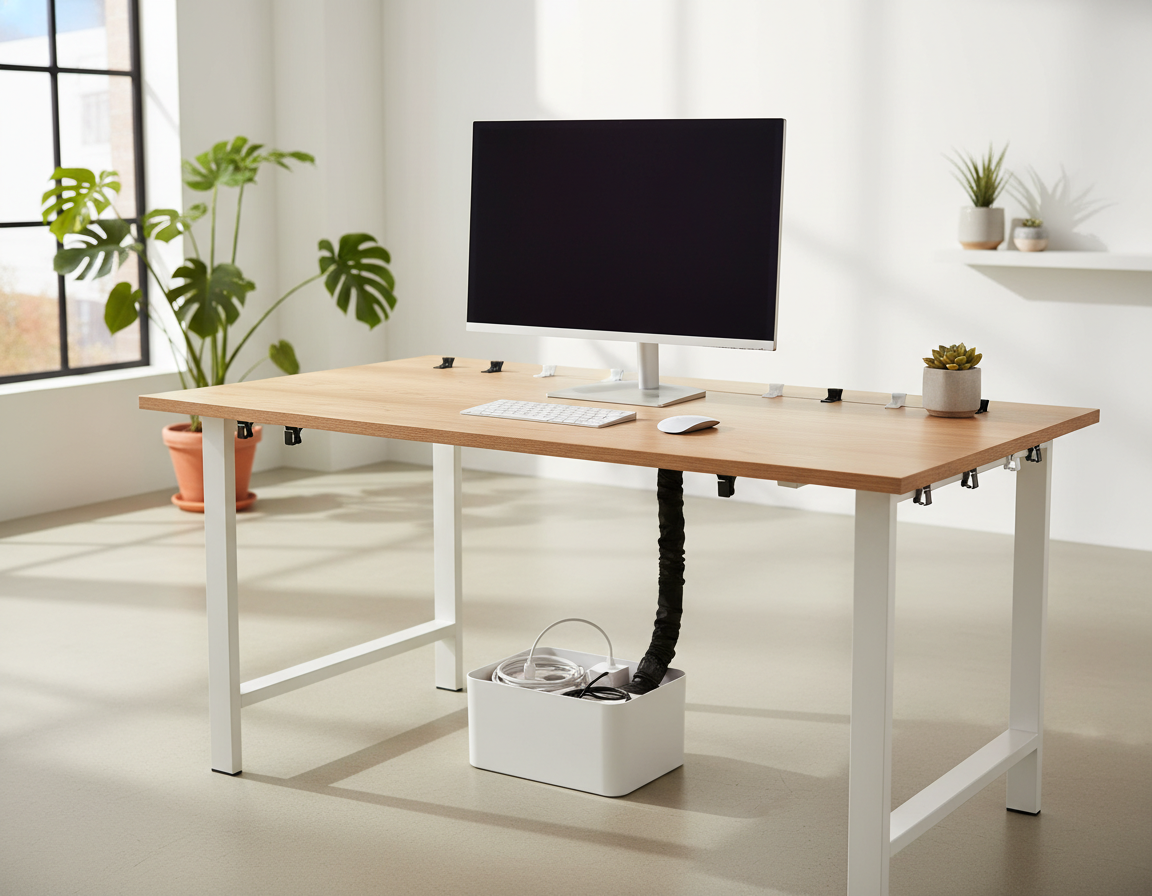
Hiding power strips
Mount power strips under the surface or place them inside a cable management box to hide bulky plugs and reduce visual noise. This also lowers trip hazards and keeps plugs reachable when you need them.
When wireless helps most
Wireless keyboards, mice, and headsets make the biggest difference on small desks, sit-stand setups, and for users who unplug often. They cut visible cords and speed daily resets.
“Label both ends once to save time during troubleshooting.”
- Mount trays for consistent routing.
- Group cables by function—power vs data.
- Keep access with service loops, not tight knots.
Lighting Layouts That Improve Focus and Reduce Eyestrain
An intentional lighting plan keeps work visible while preventing glare and fatigue. Good lighting boosts energy, comfort, and readability, and it helps productivity by reducing squinting and frequent repositioning.
Positioning to maximize natural light and cut glare
Place your workspace so windows provide side or angled natural light, not direct backlight behind the monitor. Use blinds or curtains to soften bright sun and avoid reflections on screens.
Task lights: adjustable lamps and screen bars
Use an adjustable desk lamp with a dimmer for paper work and a screen bar light for monitor-focused tasks. Position the lamp to the side of your dominant hand to prevent shadows and reflections.
Daylight-style LEDs for long workdays
Choose 5000–6500K LEDs for clear, high-contrast rendering that reduces eyestrain during extended sessions, especially in dim rooms. Dimmable options let you match evening comfort while keeping clarity.
Ambient lighting without visual noise
Keep ambient sources minimal: one backlight strip or a single warm floor lamp provides depth without competing highlights. This two-layer approach—task light plus gentle ambient light—supports focus and a calm room feel.
“Light should reduce strain and lower the need for extra movement or paper shuffling.”
- Place blinds or shades to control glare and preserve natural light.
- Pick a side-mounted lamp for paper tasks and a screen bar for monitors.
- Use daylight LEDs (5000–6500K) for long sessions to ease eyestrain.
- Route lamp and strip cables under trays or behind furniture to keep surfaces clear.
Ergonomic Accessories That Don’t Add Visual Clutter
A few well-chosen comfort upgrades stop strain and keep your surface looking intentional. Pick neutral tones and compact forms so items support posture without drawing the eye.
Keyboard and mouse positioning for neutral wrists
Keep input devices aligned with your shoulders so wrists stay neutral while you type and click. Position the keyboard so your elbows sit near a 90° angle and avoid reaching for the mouse during focused tasks.
Selection tip: prioritize one high-quality keyboard and mouse over multiple gadgets that crowd the surface. A single reliable pair improves comfort and reduces fidgeting.
Footrests and desk mats for posture and noise reduction
Use an adjustable footrest (roughly 4–12 inches) when feet don’t rest flat. It improves circulation and encourages a natural seated posture for long work sessions.
A 24×14 inch desk mat anchors the primary zone, softens wrist contact, and cuts keyboard noise without adding extra objects. Place it under your main input area to keep the setup cohesive.
“Reducing physical strain cuts the urge to move or stack items—so comfort is also a decluttering strategy.”
- Choose neutral colors to keep visual minimalism.
- Align devices with shoulders and avoid excess reach.
- Prefer one trusted keyboard and mouse for daily use.
- Install an adjustable footrest for better posture and circulation.
- Anchor your work zone with a single desk mat to reduce noise.
Digital Minimalism That Matches Your Physical Workspace
Digital clutter hides in plain sight and quickly recreates physical mess on your surface. A messy desktop and a downloads folder full of random files increase search time and raise stress during focused work.
Decluttering desktop icons and organizing files
Keep only active items on the desktop so you can find current documents at a glance. Adopt a simple folder system: Projects / Admin / Reference / Archive. That structure reduces duplicate files and saves time.
Do a weekly 10-minute file sweep. Move finished items to Archive and delete extras. Minimalist wallpapers also cut visual noise and make icons easier to see.
Using productivity apps to replace sticky notes
Replace scattered paper with one trusted app. Tools like Notion, ClickUp, or Focus by MDS centralize to-dos and timers so sticky notes no longer crowd your surface.
“One trusted app and a neat folder map halve the time you spend hunting files.”
- Reduce desktop icons to current tasks only.
- Use a Pomodoro + to-do tool to manage sessions and tasks.
- Weekly sweeps prevent digital piles from returning.
Time and Task Tools That Earn Their Spot on Your Desk
A single, visible timer can cut decision friction and keep your workflow steady. Choose one device and one capture method so your surface stays purposeful.
Pomodoro timers and smart clocks for focused sessions
The Pomodoro method uses 25-minute work intervals with short breaks. It fits neatly into short routines and keeps interruptions predictable.
Pick a small smart clock or a simple digital timer that matches your aesthetic and lives in one place on the desk. This reduces the urge to chase multiple notebooks or alarms.
Time blocking and reminders without extra stuff
Block your day into labeled segments so projects don’t bleed into other moments. Studies show focused blocks can improve allocation by about 20% when consistently applied.
Use digital reminders and recurring checklists to replace sticky notes and paper planners. A single task app plus one timing tool is enough.
- One-system rule: pick one timing method and one task capture method.
- Keep a single timer visible; avoid multiple alarms and loose notes.
- Match digital reminders to your blocks to close open loops fast.
“One tidy timing tool beats many scattered prompts.”
Daily Reset Habits to Keep Your Desk Clean Long-Term
A quick, repeatable reset each evening keeps your workspace ready for the next work session. This habit prevents small piles from growing and makes mornings calmer.
The five-minute end-of-day routine that prevents buildup
Spend five focused minutes before you leave. Follow a short sequence so the process becomes automatic.
- Clear the drop zone and put mail or chargers into their homes.
- Return active items to drawers or shelves and stack nothing loose on the surface.
- Reset zones for tomorrow: reposition the keyboard and mouse, and place the notebook where you’ll pick it up.
Cleaning high-touch items like keyboards, mice, and screens
Wipe surfaces safely. Use alcohol wipes for mice, phone, and keyboard tops. For screens, pick a screen-safe wipe or microfiber with a spray solution.
Keep a small brush to remove crumbs between keys. Compressed air or a mini vacuum helps prevent grime that makes surfaces look neglected.
Nothing left loose: aim to start each morning with a ready workspace so big reorganizations are rare.
Schedule one deeper weekly clean to keep daily maintenance quick and realistic. Habit-based care reduces the need for major overhauls.
Personalize Without Creating Clutter in Your Home Office
Small, intentional accents turn a workroom into a place you want to use every day. Personalization matters because a home office that feels motivating improves focus and mood. At the same time, too many decorations quickly create visual noise that pulls attention from work.
Low‑maintenance greenery: add one small plant to bring life without extra chores. Succulents need watering about every 2–3 weeks and take up little space. A snake plant tolerates low light and is often recommended for air-refreshing claims.
Placement and minimal footprint
Keep plants off the main surface: place one on a monitor corner shelf or a nearby shelf rather than scattered across the room. One well-placed pot adds visual balance and preserves work surface area.
Photos, art, and a calming palette
Limit personal photos to a small set—three framed prints is a good rule. Use matching frames and a neutral palette (white, black, or wood) with one subtle accent color to keep the room cohesive.
- Choose one wall piece rather than multiple small objects on the surface.
- Reserve the surface for tools, not display items.
- Rotate a single photo occasionally to keep the space fresh without adding clutter.
“A few consistent accents make a home office feel personal while keeping the workspace ready for focused work.”
Conclusion
Wrap up your approach by treating the workspace as a system: start with the foundation, then add small upgrades in a clear way.
Choose the right desk and create purposeful zones so only essentials stay visible. Freeing surface space is the fastest way to make a room calmer and more functional without a major remodel.
Key setup wins include monitor arms or stands, a single dock for laptops, hidden cable routing, and simple storage that prevents piles. Good lighting and ergonomic accessories support sustained work, not just looks.
Habits multiply results: a short daily reset keeps even busy setups consistent over time. Implement tips in order—foundation first, then upgrades—so the space stays useful and easy to maintain.