Minimal gear means keeping only the tools you use every day and placing them where your body naturally reaches. The Ergonomic Zone System defines a primary reach (60–80 cm), a secondary reach (about 120 cm), and tertiary areas beyond that plus vertical storage. This approach pairs with OSHA’s neutral posture to cut friction and strain.
This short how-to guide shows a repeatable setup you can use in a home or small office without buying extra tools. Set expectations: fewer items, clearer zones, and smoother task flow.
When a desk is arranged around reach zones and neutral posture, tasks move faster because you spend less time searching, stretching, or shifting focus. The core promise: better comfort, focus, and efficiency from less clutter.
Next, the article will cover ergonomics, zone-based placement, lighting, storage, and cable management. This is for remote workers, small spaces, shared desks, and hot-desking. Expect practical ideas and a clear guide to align your environment to the work you do today.
Why Minimal Gear Helps You Work Faster in a Smaller Space
A cluttered desk forces tiny choices that add up to major time loss during the day. In tight quarters, every extra item becomes a visual prompt that pulls attention away from the task at hand.
Reducing visual clutter to cut distractions and improve focus
Fewer visible items mean fewer attention prompts. That lowers decision fatigue and helps you enter longer, deeper focus sessions without interruptions.
Designing for efficiency instead of more tools
Follow three simple rules: keep daily-use items on the desktop, move occasional things to drawers, and store everything else off the primary surface.
- Use cable trays and drawer organizers to hide nonessential items.
- Adopt a 5-minute daily reset to clear visual noise before you start work.
- Favor vertical storage to reclaim useful surface area in a small space.
Minimal gear is about faster task flow, fewer interruptions, and less time spent reorganizing. Choose tools that earn their spot by saving time or reducing strain, not by adding features you rarely use.
Start With Ergonomics: Build a Workspace That Supports Neutral Posture
Start by tuning your chair and screen so your body sits in a neutral, balanced pose that cuts small aches across the day.
Neutral posture means your head sits over your shoulders, your elbows rest near 90°, and your wrists stay straight while typing. This alignment lowers muscle tension and reduces long-term strain that interrupts focus.
Head-to-wrist checklist
Keep your chin slightly tucked, shoulders relaxed, and upper arms close to the body. Aim for elbows around 90° and wrists flat when using keys or a mouse.
Lower-body and legroom basics
Support the lumbar curve with a chair or cushion. Feet should be flat on the floor or on a footrest, and knees at or just below hip height.
Clear under-desk space so you can move your legs and avoid twisted sitting positions that create aches over time.
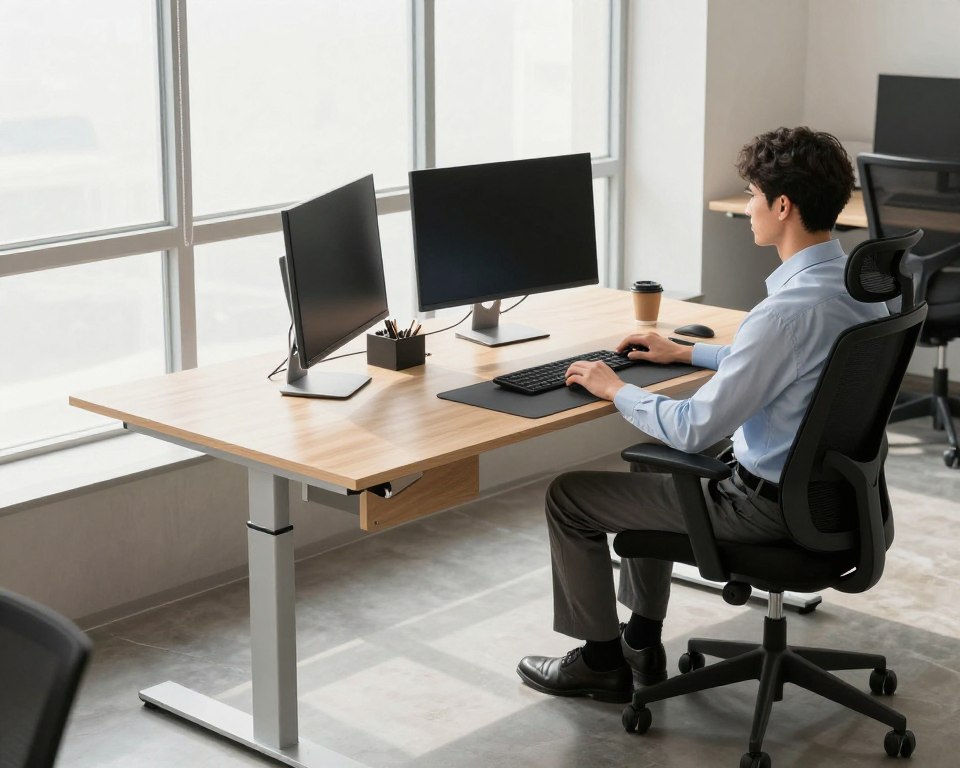
Monitor and screen placement
Place the monitor about an arm’s length away and set the top of the viewing area at or slightly below eye level. This reduces neck and eye fatigue during long sessions.
Why adjustability beats desk size
Height-adjustable chairs and desks let the furniture fit the person, not the other way around. Sit-stand options also reduce low-back discomfort and let you alternate positions during the day.
“Adjust the setup to your body each morning; small changes add up to big relief.”
- Define neutral posture in plain terms and use it as your default.
- Follow the head-to-wrist checklist each time you sit or stand.
- Keep the monitor distance and height within OSHA guidelines to protect neck and eyes.
Use the Ergonomic Zone System to Arrange Your Desk Like a Pro
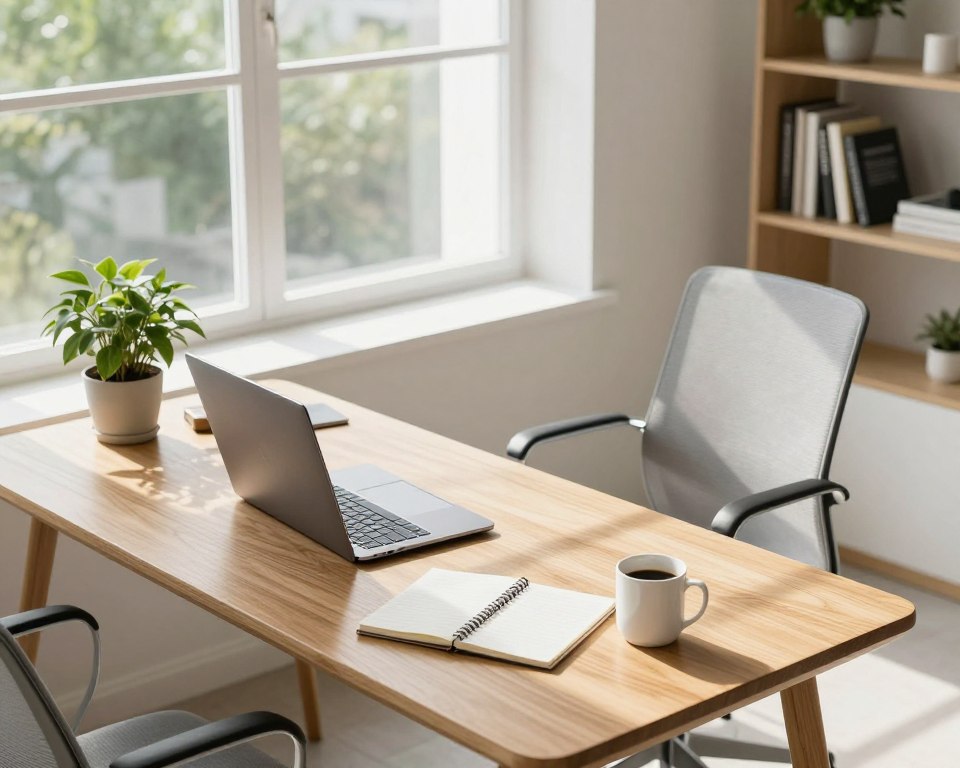
Organize your desk by reach zones so every tool lives where your body naturally moves. The Ergonomic Zone System uses concentric areas to cut wasted motion and lower cumulative strain.
Primary reach: 60–80 cm for hands-on tools
Keep the keyboard and mouse in the primary area, about 60–80 cm from your torso. This prevents shoulder and neck fatigue from repeated reaching.
Tip: Place the most-used items here so your arms stay relaxed and your hands always return to the same high-efficiency point.
Secondary reach: ~120 cm for screens and references
Monitors, phone, and current reference documents belong in the secondary zone at roughly an arm’s length (~120 cm). This keeps visual tools accessible without crowding the primary area.
Tertiary zone and vertical space: store infrequent items
Put spare supplies, binders, and decor beyond 120 cm or on vertical shelving. Using vertical solutions frees desktop area in a compact office and reduces visual clutter.
“If you touch it hourly, it belongs closer; if weekly, move it farther and off the desktop.”
- Zones create a consistent task area and smooth the workflow by reducing context switching.
- Do a quick self-audit: hourly items = primary/secondary; weekly items = tertiary.
- Use vertical shelves and drawers as simple solutions to reclaim desk surface and maintain efficiency.
For a step-by-step guide to ergonomic desk setup, see this minimal office desk setup.
Minimal Gear Checklist for a Productive Workspace Setup
A small set of high-quality tools keeps decisions simple and your hands where they belong.
Core desktop items that earn a spot
Checklist: a reliable computer, a comfortable keyboard, a precise mouse, and one clear surface for current tasks.
Choose items that cut time lost to searching or switching. Hide cables and keep a 5-minute clearing routine to reset the setup each day.
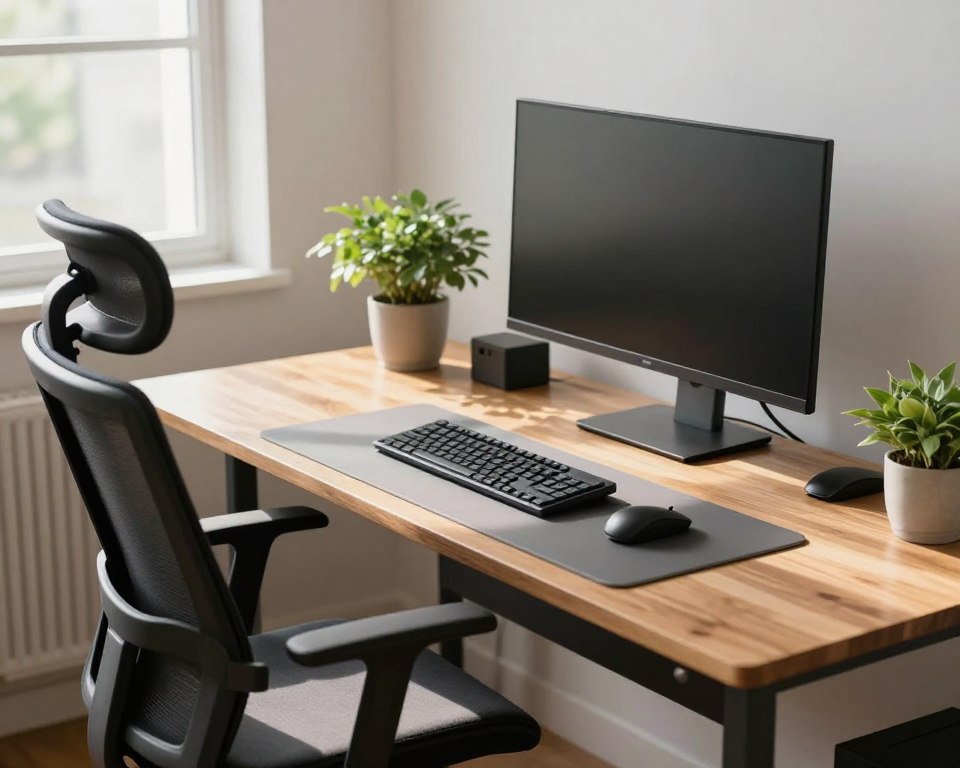
Monitor strategy for multitasking
Two monitors speed common multitasking like reference and editing. One larger monitor often wins when desk depth is limited.
Either way, place the monitor at arm’s length with the top at or just below eye level to reduce neck and eye strain.
Ergonomic inputs and standing desk essentials
Select keyboards and mice that support neutral wrist alignment and stable hand positioning within your primary reach zone.
For a standing desk, add an anti-fatigue mat and a foot support or rail to encourage subtle movement during position changes.
Lighting must-haves
Use task lighting and glare control to protect your eyes. Angle lamps and tilt screens to avoid harsh reflections that increase eye strain.
Tip: invest in fewer, better items; the right light and inputs deliver the biggest benefits.
How to Set Up a Sit-Stand Desk for Movement Throughout the Day
Small, frequent changes of posture are the most reliable way to gain the health benefits of a height-adjustable standing desk. The goal is movement throughout day, not standing for hours on end.
Standing all day is not the target
EU-OSHA warns that prolonged static standing can create its own health risks. Static standing strains legs and back and can reduce overall comfort.
Practical intervals to start
Begin with 20–40 minute standing blocks and aim for 2–4 transitions per workday. A simple template is the optional “20-8-2” rhythm: sit 20, stand 8, move 2. Use a timer if you need to track time.
Quick posture checks when you switch
At each change, confirm shoulders relaxed, wrists neutral, and screen height steady. When standing, spread weight evenly and keep a neutral posture just as you would when sitting.
“The real benefit of a sit-stand desk is enabling movement throughout day through easy transitions.”
- Debunk the myth: standing all day does not equal better productivity.
- Start small, increase standing blocks by comfort and time.
- Smooth transitions preserve focus and keep tasks moving the right way.
Productivity Workstation Layout: A Step-by-Step Placement Map
Start by placing the desk where light supports tasks, not where glare forces constant adjustments.
Work from the room’s natural flow: avoid backlighting from windows and keep sightlines free of movement that causes distractions.
Desk positioning and light control
Face the desk so side windows supply soft light. If a window is behind you, add blinds to stop reflections on the screen.
Use a task lamp for the work area to keep the desktop evenly lit without raising overall room brightness.
Screen and monitor basics
Set the monitor an arm’s length away with the top at or just below eye level.
Angle the screen slightly to cut neck strain and tilt to reduce glare from overhead lighting.
Define a clear task area
Keep keyboard and mouse centered in the primary area so active work stays within easy reach.
Move references to the secondary zone and stash infrequent items in vertical storage to avoid crowding.
“If you must move your keyboard to write or shift items before starting, the setup needs re-zoning.”
Quick placement checklist
- Place desk to avoid direct backlight and limit visual distractions.
- Confirm monitor distance and top-of-screen height for comfort.
- Keep the primary task area clear; use shelves for extras.
Desk Organization That Stays Organized: Storage, Vertical Space, and Clear Surfaces
Good storage is the silent force that keeps a desk clear and a day on track. Without a designated place for items, your work surface becomes a catchall and the room fills with visual noise.
Floor-to-ceiling solutions reclaim valuable surface space
In a small home office, use floor-to-ceiling cabinets or shelves to move infrequent items off the desk. Tall units give you vertical storage that liberates the work surface for active tasks.
Mix open and closed storage for access and calm
Keep frequently used items on open shelves so they are easy to grab. Use closed cabinets or drawers for papers and objects that create visual distraction when left visible.
Protect comfort with clearance rules
Maintain at least ~60 cm of knee clearance from the cabinet face to the desk edge. That distance prevents chair collisions and avoids cramped, awkward sitting positions.
“A clear desk depends on a real place for everything.”
- Label zones: mark shelves for supplies, current projects, and archive items.
- Keep a current-project shelf: one small area for active work avoids desktop overflow.
- Avoid turning the desk into storage: reserve the surface for tasks, not boxes or long-term files.
Thoughtful storage design reduces start-up time each morning and makes task switching smoother. For more ideas on keeping surfaces tidy, see desk organization ideas.
Cable and Power Management for a Clean, Flexible Setup
Cables that run freely across a desk are a hidden source of small interruptions and damaged connectors. Taming cords keeps the office tidy and the space safe for daily use.
Routing tip: group power and data cables, then direct them to the desk corner nearest the wall outlet. This simple way prevents cross-desk tangles and makes adding a device part of the setup, not a chore.
Under-desk planning for adjustable desks
Leave 10–15 cm of vertical clearance under the desktop for trays and power strips. That gap stops cables from being pinched when desks move and protects connectors during height changes.
Keep the tower off the floor
Lift the computer tower from the floor to reduce dust intake and improve airflow. A mobile, height-adjustable CPU cart is one of the best solutions: it moves with the desk so cords never pull tight or disconnect.
“A monthly check of slack at the highest desk position keeps cables secure and prevents surprises.”
- Check cable slack once per month at full height.
- Label power vs. data runs so troubleshooting is faster.
- Use Velcro straps and a single under-desk tray for neat, lasting results.
Result: fewer tangles, clearer floor space, and an efficient setup that supports fast, focused work without extra clutter.
Layout Blueprint for Deep Work: The Solo Power Hub</h2>
Set up your L-shaped standing desk so the corner isn’t a trap but a strategic junction between two clear work areas. The Solo Power Hub is a deep-work-first approach for one person in a compact office or dedicated corner.
How to use an L-shaped desk without wasting the corner
Rule: don’t sit straddling the corner. Assign one wing as the primary area for computer work and the other as a support wing. This avoids awkward reaches and keeps the main area uncluttered.
Dominant-hand placement: building a “cockpit” for computer work
Place the keyboard, mouse, and primary monitor on the side matching your dominant hand. This creates a compact cockpit that reduces repetitive reaching and speeds common tasks.
Secondary wing uses: notes, documents, and laptop staging
Use the secondary wing for printed notes, a laptop, or reference stacks. Keep those items off the primary surface to protect focus and reduce context switching.
Space-saving monitor stands or arms to free up your primary work zone
Lift one or two monitors with arms or low-profile stands to reclaim desk surface and keep the top of the screen at or just below eye level. This preserves ergonomic height and frees space for active tasks.
“Keep the primary zone clear, mute nonessential alerts, and stage only current materials within reach.”
- Define the Solo Power Hub: one-person, deep-work-focused area.
- L-shape rule: primary wing for the computer; secondary for support.
- Deep work checklist: primary zone uncluttered, notifications limited, required items within reach.
Shared Spaces That Still Feel Personal: Collaborative Duo and Hot-Desking Options</h2>
Designing a shared office means solving two workflows in one room. The goal is clear personal zones, fair lighting, and fast transitions so both people can do focused tasks and talk without constant interruption.
Mirrored L-shape to cut distractions and keep lines open
A mirrored L-shape gives each person a defined zone that reduces direct visual distractions. Both can turn to speak without crossing the other’s primary area.
Storage choices: centralized, personal, or hybrid
Centralized storage fits shared resources. Personal lockers fit distinct roles. A hybrid system blends both for mixed teams.
Ergonomic adjustability checklist for two users
- Independent chair height and lumbar controls.
- Each monitor set to the user’s eye level and distance.
- Separate keyboard/mouse that support neutral wrists and clear legroom.
- Even task lighting to avoid glare on either screen.
Hot-desking success: fast, flexible setup
Standardized docks, adjustable monitor arms, identical ergonomic keyboards, and a rapid personalization kit (small caddy and preset desk heights) let anyone start quickly.
Low setup friction means less time reconfiguring and more time on real work.
Conclusion</h2>
C clear zones, correct posture, and regular movement form a simple formula that makes work easier. ,
Keep primary tools within 60–80 cm, place references at ~120 cm, and move rare items to vertical storage. Follow OSHA-friendly neutral posture: monitor at eye level, elbows near 90°, and ~60 cm knee clearance for comfort.
Use sit‑stand as a tool: aim for 20–40 minute standing blocks and avoid long, static standing per EU‑OSHA. Allow 10–15 cm under‑desk slack for cables and trays.
The gains are immediate: faster task start-up, less time moving things, and steadier focus. Pick one desk plan (solo, shared, or hot‑desk), apply the placement map, and tweak the setup over one week based on real work friction.